鼠标拾取 x y 坐标绘制线功能记录
项目需求
最近项目上有个需求是点击弹窗显示一张地图(图片),用户可以在地图上点击拾取当前坐标的 x y 并绘制成线,以达到在地图上做标注的功能,直接使用地图框架显得太重,于是要求手写一个 svg 画线功能,并将点击的 x y 坐标提交到后台用以回显
开始
好在百度了一篇有个画线功能的 demo ,不过这个 demo 是 js 写的,还要改成 Vue 写法 
第一版
完全按照 demo 逻辑书写的,方法繁杂,可读性差、过度操纵Dom
1
2
3
4
5
6
7
8
9
|
var line = document.createElementNS(svgns,"line");
line.setAttribute("x1",dot1.style.left);
line.setAttribute("y1",dot1.style.top);
line.setAttribute("x2",dot1.style.left);
line.setAttribute("y2",dot1.style.top);
line.setAttribute("stroke","red");
line.setAttribute("fill","none");
svger.appendChild(line);
|
第二版
删除多余的动画效果,原 demo 点与线分别是 两个层级div 结构太冗余,对 Dom 结构进行了重新调整,原 demo 坐标单位是 px,本项目功能地图标记需要在首页展示由于大小尺寸不同 px 会导致标记位置发生偏移,故修改成 % 单位,只要保持比例,标记信息就不会偏移,以下为核心代码
1
2
3
4
5
6
7
8
9
10
11
12
13
14
15
|
const imageSize = res.availableMapImage.imageSize.split(',');
let N = imageSize[0] / (1200 - 40);
this.passMapSetting.mapSize.width = imageSize[0] / N;
this.passMapSetting.mapSize.height = imageSize[1] / N;
const container = this.$refs.container;
dotObj.x = ((posX / container.clientWidth) * 100);
dotObj.y = ((posY / container.clientHeight) * 100);
|
第三版
基本进行重写,实现 零DOM 操作,完全数据操纵,这也是 Vue 所提倡的:数据驱动模型,
以下是点绘制成线并实现连接逻辑梳理
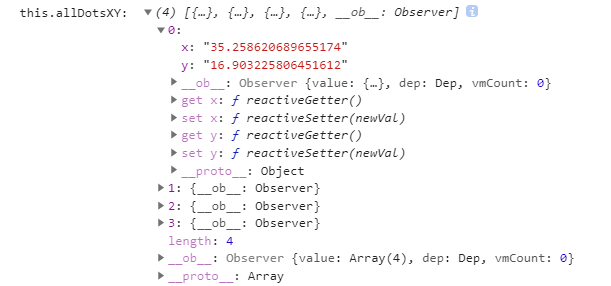
首先在 data 中定义两个数组(用以存储点和线的数据模型)和一个 boolean 的值(用于清除标记函数判断)
1
2
3
4
5
6
7
| data() {
return {
allDotsXY: [],
allLinesXY: [],
rePaintFlag: true
};
},
|
绑定点击事件,拾取当前点击的坐标值,并作为参数传给 createDotAndLine() 函数
rePaintFlag 默认为 true 点击编辑回显绘制线路的时候条件成立,再次点击就表示要重绘,即清空原数据模型
1
2
3
4
5
6
7
8
9
10
11
12
13
14
15
16
17
| clickContainer(event) {
if (this.rePaintFlag) {
this.removeMark();
}
let mousePosition = this.mousePos(event);
this.createDotAndLine(mousePosition.x, mousePosition.y);
},
mousePos(e) {
if (e.layerX) {
return { x: e.layerX, y: e.layerY };
}
},
|
在 createDotAndLine 函数中定义两个对象 dotObj lineObj 用来构造点的数据模型和线的数据模型,并将 dotObj.x dotObj.y 坐标值处理成 % 单位,每点击一次就往 allDotsXY push当前坐标值,其中定义 lastDot 用来存储本次点击的前一个元素,所以要在 当前点击的坐标 push 前存储,为lineObj 对象构造做准备。
1
2
3
4
5
6
7
8
9
| const dotObj = {};
const lineObj = {};
const container = this.$refs.container;
dotObj.x = ((posX / container.clientWidth) * 100);
dotObj.y = ((posY / container.clientHeight) * 100);
const lastDot = this.allDotsXY.length > 0 ? this.allDotsXY[this.allDotsXY.length - 1] : null;
this.allDotsXY.push(dotObj);
|
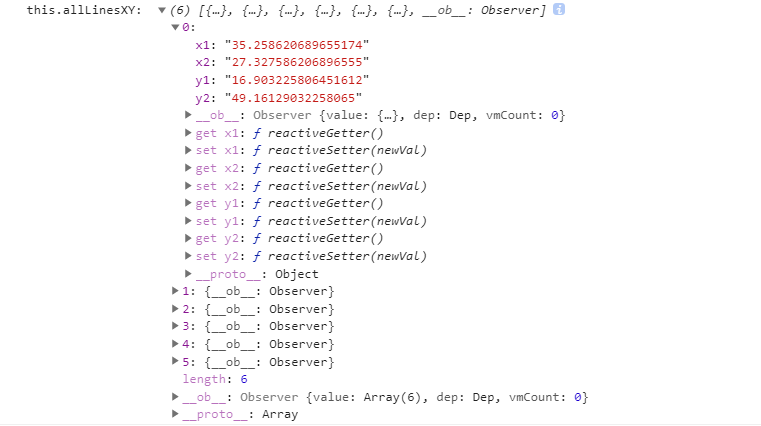
要想让 两条线实现互连 则需要这种格式的数据
1
2
3
4
5
6
7
8
9
10
11
12
13
14
15
16
| allLinesXY: [
{
x1: 30
y1: 69
x2: 70
y2: 80
},
{
x1: 70
y1: 80
x2: 55
y2: 36
}
]
|
所以只需要每次点击,把上一次点击的 x y 临时存储到 lastDot 中即可,如果 this.allDotsXY 长度大于 1 即开始构造 lineObj 对象
1
2
3
4
| lineObj.x1 = lastDot.x;
lineObj.y1 = lastDot.y;
lineObj.x2 = ((posX / container.clientWidth) * 100);
lineObj.y2 = ((posY / container.clientHeight) * 100);
|
以下是 createDotAndLine() 函数完整代码,第一次点击构造点数据模型并 push 到 allDotsXY 数组中,第二次点击 allDotsXY 满足条件开始构造线数据模型以此类推…
1
2
3
4
5
6
7
8
9
10
11
12
13
14
15
16
17
18
19
20
21
22
23
24
|
createDotAndLine(posX, posY) {
const dotObj = {};
const lineObj = {};
const container = this.$refs.container;
dotObj.x = ((posX / container.clientWidth) * 100);
dotObj.y = ((posY / container.clientHeight) * 100);
const lastDot = this.allDotsXY.length > 0 ? this.allDotsXY[this.allDotsXY.length - 1] : null;
this.allDotsXY.push(dotObj);
console.log('add-dots: ', this.allDotsXY);
if (this.allDotsXY.length > 1) {
lineObj.x1 = lastDot.x;
lineObj.y1 = lastDot.y;
lineObj.x2 = ((posX / container.clientWidth) * 100);
lineObj.y2 = ((posY / container.clientHeight) * 100);
this.allLinesXY.push(lineObj);
console.log('add-lines: ', this.allLinesXY);
}
},
|
数据模型已经构造完毕,剩下只需在 <template> 中使用 v-for 遍历两个数组即可
1
2
3
4
5
6
7
8
9
10
11
12
13
14
15
16
17
18
19
20
21
22
23
24
25
26
27
28
29
30
31
32
33
34
35
36
37
38
| <template>
<!-- 点击事件容器 -->
<div
class="container"
ref="container"
:style="{
width: passMapSetting.mapSize.width + 'px',
height: passMapSetting.mapSize.height + 'px'
}"
@click="clickContainer($event)"
>
<img class="map" :src="passMapSetting.mapUrl" />
<svg ref="svgContainer">
<line
class="line"
v-for="(item, index) in allLinesXY"
:key="index+Math.random()"
:x1="`${item.x1}%`"
:y1="`${item.y1}%`"
:x2="`${item.x2}%`"
:y2="`${item.y2}%`"
/>
<circle
v-for="(item, index) in allDotsXY"
:key="index+Math.random()"
:cx="`${item.x}%`"
:cy="`${item.y}%`"
r="7"
fill="#52c41a"
/>
</svg>
</div>
</template>
|
最后清除标记函数,这很好的体现了Vue数据响应式的特性,只需置空两个数组即可,让我们摆脱繁杂的 Dom 操作,只关注数据
1
2
3
4
5
6
7
8
|
removeMark() {
this.allDotsXY = [];
this.allLinesXY = [];
this.rePaintFlag = false;
}
|
rePaintFlag
默认为 true,则点击编辑回显绘制线路的时候执行 removeMark() 手动改为 false, 防止下次点击再次执行
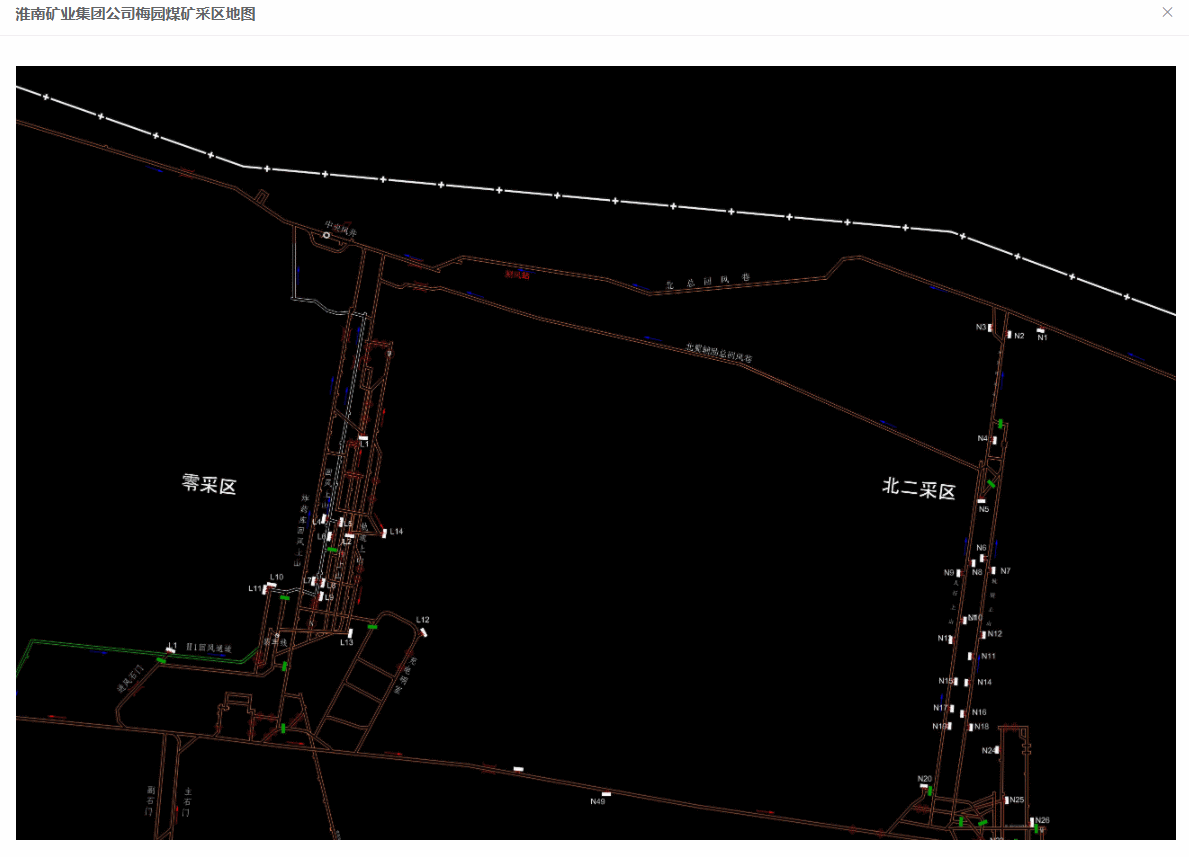
效果图
提交后台
后台接收字段值为字符串,父组件里点击保存按钮执行 saveData()
1
| <el-button icon="el-icon-check" type="primary" @click="saveData()">保 存</el-button>
|
封装好的子组件
1
2
3
4
5
6
7
| <!-- 绘制通道线路组件 -->
<passLineMarking
ref="lineMarkingComps"
:passMapSetting="passMapSetting"
@saveAllDots="saveAllDots"
>
</passLineMarking>
|
执行子组件的 handleAllDots() 函数
1
2
3
4
|
saveData() {
this.$refs.lineMarkingComps.handleAllDots();
},
|
定义一个变量将 coordinate 将 allDotsXY 数组遍历拼接成字符串并提交至父组件函数 saveAllDots()
1
2
3
4
5
6
7
8
9
10
11
12
13
14
|
handleAllDots() {
let coordinate = '';
this.allDotsXY.map((item) => {
coordinate += `${item.x},${item.y};`;
});
console.log(coordinate);
this.$emit('saveAllDots', coordinate);
},
|
父组件函数 saveAllDots(),接收来自子组件参数,赋值给 from.coordinate 字段,之后表单提交至后台,并关闭弹窗。
1
2
3
4
5
|
saveAllDots(coordinate) {
this.form.coordinate = coordinate;
this.innerVisible = false;
},
|
地图线路回显
接收来自后台返回的坐标串,点击弹窗 判断如果 this.form.coordinate 有值则表示是点击的是 编辑按钮 就要进行回显,执行子组件的 showPassLine() 函数,并把 this.form.coordinate 作为参数携带过去
1
2
3
4
5
6
7
8
9
10
|
openInnerDialog() {
this.innerVisible = true;
if (this.form.coordinate) {
this.$nextTick(() => {
this.$refs.lineMarkingComps.showPassLine(this.form.coordinate);
});
}
},
|
接收父组件传过来的参数并进行数据模型构造
1
| coordinate.slice(0, (coordinate.length - 1)).split(';')
|
slice 函数裁剪从零到串的长度减一就是就是裁剪掉最后一个分号(防止split分割出一个空数组),并以分号为结尾分割串返回数组类型
coordinate 分割后的数据结构
遍历分割后的数组,利用 数组解构 以逗号分割 每个元素 复制 x y 并返回到 this.allDotsXY 数组中
1
2
3
4
5
| this.allDotsXY = coordinate.map((item) => {
const [x, y] = item.split(',');
return { x, y };
});
|
this.allDotsXY 处理好的数据结构
最后根据 this.allDotsX 构造 this.allLinesXY 数据模型
1
2
3
4
5
6
7
8
9
10
11
12
13
14
15
16
| for (const [index, dot] of this.allDotsXY.entries()) {
if (index < this.allDotsXY.length - 1) {
const lineObj = {};
lineObj.x1 = dot.x;
lineObj.y1 = dot.y;
lineObj.x2 = this.allDotsXY[index + 1].x;
lineObj.y2 = this.allDotsXY[index + 1].y;
this.allLinesXY.push(lineObj);
console.log('this.allLinesXY: ', this.allLinesXY);
}
}
|
最终 this.allLinesXY 数据模型构造完毕,回到开始数据驱动模型,数据存在则视图就会更新,整个回显完全不需要关注视图层,只需要构建数据模型
showPassLine 函数完整代码
1
2
3
4
5
6
7
8
9
10
11
12
13
14
15
16
17
18
19
20
21
|
showPassLine(coordinate) {
this.allDotsXY = coordinate.slice(0, (coordinate.length - 1)).split(';').map((item) => {
const [x, y] = item.split(',');
return { x, y };
});
for (const [index, dot] of this.allDotsXY.entries()) {
if (index < this.allDotsXY.length - 1) {
const lineObj = {};
lineObj.x1 = dot.x;
lineObj.y1 = dot.y;
lineObj.x2 = this.allDotsXY[index + 1].x;
lineObj.y2 = this.allDotsXY[index + 1].y;
this.allLinesXY.push(lineObj);
console.log('this.allLinesXY: ', this.allLinesXY);
}
}
},
|
passLineMarking 点击连线组件完整代码
1
2
3
4
5
6
7
8
9
10
11
12
13
14
15
16
17
18
19
20
21
22
23
24
25
26
27
28
29
30
31
32
33
34
35
36
37
38
39
40
41
42
43
44
45
46
47
48
49
50
51
52
53
54
55
56
57
58
59
60
61
62
63
64
65
66
67
68
69
70
71
72
73
74
75
76
77
78
79
80
81
82
83
84
85
86
87
88
89
90
91
92
93
94
95
96
97
98
99
100
101
102
103
104
105
106
107
108
109
110
111
112
113
114
115
116
117
118
119
120
121
122
123
124
125
126
127
128
129
130
131
132
133
134
135
136
137
138
139
140
141
142
143
144
145
146
147
148
149
150
151
152
153
154
155
156
157
158
159
160
161
162
163
164
165
166
167
168
169
170
171
172
173
174
175
176
177
178
179
180
181
182
183
184
185
186
| <template>
<div
class="container"
ref="container"
:style="{
width: passMapSetting.mapSize.width + 'px',
height: passMapSetting.mapSize.height + 'px'
}"
@click="clickContainer($event)"
>
<img class="map" :src="passMapSetting.mapUrl" />
<svg ref="svgContainer">
<line
class="line"
v-for="(item, index) in allLinesXY"
:key="index+Math.random()"
:x1="`${item.x1}%`"
:y1="`${item.y1}%`"
:x2="`${item.x2}%`"
:y2="`${item.y2}%`"
/>
<circle
v-for="(item, index) in allDotsXY"
:key="index+Math.random()"
:cx="`${item.x}%`"
:cy="`${item.y}%`"
r="7"
fill="#52c41a"
/>
</svg>
</div>
</template>
<script>
export default {
data() {
    return {
        allDotsXY: [],
        allLinesXY: [],
        rePaintFlag: true
    };
},
props: {
passMapSetting: Object
},
computed: {
},
created() {
},
mounted() {
},
methods: {
clickContainer(event) {
if (this.rePaintFlag) {
this.removeMark();
}
let mousePosition = this.mousePos(event);
this.createDotAndLine(mousePosition.x, mousePosition.y);
},
mousePos(e) {
if (e.layerX) {
return { x: e.layerX, y: e.layerY };
}
},
createDotAndLine(posX, posY) {
const dotObj = {};
const lineObj = {};
const container = this.$refs.container;
dotObj.x = ((posX / container.clientWidth) * 100);
dotObj.y = ((posY / container.clientHeight) * 100);
const lastDot = this.allDotsXY.length > 0 ? this.allDotsXY[this.allDotsXY.length - 1] : null;
this.allDotsXY.push(dotObj);
console.log('add-dots: ', this.allDotsXY);
if (this.allDotsXY.length > 1) {
lineObj.x1 = lastDot.x;
lineObj.y1 = lastDot.y;
lineObj.x2 = ((posX / container.clientWidth) * 100);
lineObj.y2 = ((posY / container.clientHeight) * 100);
this.allLinesXY.push(lineObj);
console.log('add-lines: ', this.allLinesXY);
}
},
handleAllDots() {
let coordinate = '';
this.allDotsXY.map((item) => {
coordinate += `${item.x},${item.y};`;
});
console.log(coordinate);
this.$emit('saveAllDots', coordinate);
},
showPassLine(coordinate) {
this.allDotsXY = coordinate.slice(0, (coordinate.length - 1)).split(';').map((item) => {
const [x, y] = item.split(',');
return { x, y };
});
console.log(this.allDotsXY);
console.log(coordinate.slice(0, (coordinate.length - 1)).split(';'));
for (const [index, dot] of this.allDotsXY.entries()) {
if (index < this.allDotsXY.length - 1) {
const lineObj = {};
lineObj.x1 = dot.x;
lineObj.y1 = dot.y;
lineObj.x2 = this.allDotsXY[index + 1].x;
lineObj.y2 = this.allDotsXY[index + 1].y;
this.allLinesXY.push(lineObj);
console.log('this.allLinesXY: ', this.allLinesXY);
}
}
},
removeMark() {
this.allDotsXY = [];
this.allLinesXY = [];
this.rePaintFlag = false;
}
}
};
</script>
<style lang="less" scoped>
.container {
position: relative;
cursor: pointer;
svg {
height: 100%;
width: 100%;
position: absolute;
}
/deep/ .line {
stroke: #FADB14;
stroke-width: 5;
fill: none;
}
.map {
height: 100%;
width: 100%;
position: absolute;
}
}
</style>
|
父组件引用
1
2
3
4
5
6
7
8
9
10
11
12
13
14
15
16
17
18
19
20
21
22
23
24
| <!-- 嵌套弹出框 -->
<el-dialog
class="innerDialog"
ref="innerDialog"
width="1200px"
:destroy-on-close="true"
:title="passMapSetting.mapTitle"
:close-on-click-modal="false"
:visible.sync="innerVisible"
append-to-body
>
<passLineMarking
ref="lineMarkingComps"
:passMapSetting="passMapSetting"
@saveAllDots="saveAllDots"
></passLineMarking>
<div slot="footer" class="dialog-footer btnMargin">
<el-button icon="el-icon-magic-stick" type="warning" @click="rePaint()">重 绘</el-button>
<el-button icon="el-icon-close" @click="innerVisible=false">取 消</el-button>
<el-button icon="el-icon-check" type="primary" @click="saveData()">保 存</el-button>
</div>
</el-dialog>
|
1
2
3
4
5
6
|
import PassLineMarking from './passDialogComps/passLineMarking';
components: {
PassLineMarking
},
|
父组件所依赖的方法
1
2
3
4
5
6
7
8
9
10
11
12
13
14
15
16
17
18
19
20
21
22
23
24
25
26
27
|
openInnerDialog() {
this.innerVisible = true;
if (this.form.coordinate) {
this.$nextTick(() => {
this.$refs.lineMarkingComps.showPassLine(this.form.coordinate);
});
}
},
saveData() {
this.$refs.lineMarkingComps.handleAllDots();
},
saveAllDots(coordinate) {
this.form.coordinate = coordinate;
this.innerVisible = false;
},
rePaint() {
this.$refs.lineMarkingComps.removeMark();
},
|
结语
整个功能从拾取坐标到绘制线路再到编辑回显整套流程已经梳理完毕。此笔记目的是为了加深印象,对数据构造、es6语法糖、Vue组件化、父子传值、数据响应、svg 有了一定的理解