高德地图 轨迹巡航
本次场景需求是查询历史数据返回一组经纬度和相关数据在地图中使用轨迹巡航API巡航,期间的文本框每经过一个坐标其数值就会改变,文章末尾有demo文件,需要自取。
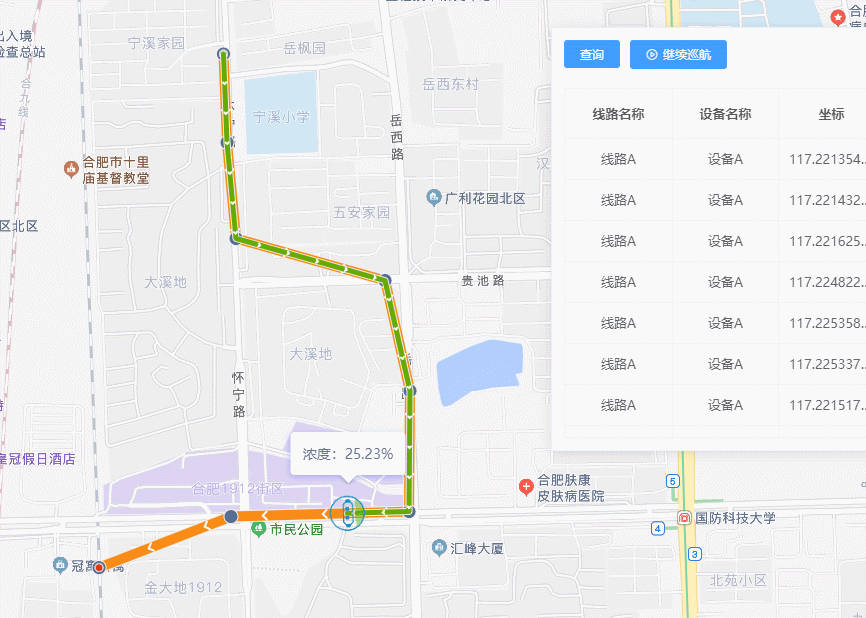
效果图
Data
展开详情
1 | data() { |
Template
template 包含一个地图实例容器,一个 popover 弹出框,弹出框里包含一个 table、五个按钮 查询、开始巡航、暂停巡航、继续巡航、和触发popover 弹出框的 巡航历史 按钮
展开详情
1 | <template> |
初始化Map
安装高德
1 | yarn add @amap/amap-jsapi-loader --save |
对高德地图加载器进行了简单封装。如其他页面需要引入高德API只需引入 AMapLoader.js 即可
新建 AMapLoader.js
1 | import AMapLoader from "@amap/amap-jsapi-loader"; |
引入 AMapLoader.js
1 | import AMapLoader from "@/utils/AMapLoader"; |
在 created() 里初始化
1 | created() { |
在 methods() 中书写 initAMap()
1 | initAMap() { |
查询
查询触发轨迹巡航路线并展示响应的表格数据
1 | // 查询按钮 |
绘制轨迹巡航
drawNavgtrPath() 函数解释:
new一个PathSimplifier(巡航路线),其中getPath回调用来处理PathSimplifier所需的路径坐标new一个InfoWindow(信息窗体),打开信息窗体,设置窗体内容that.pathSimplifierIns.setData([dataList])设置巡航路线源数据that.pathSimplifierIns.createPathNavigator()创建一个(巡航器),配置相应的参数that.navgtr.on("move", function () {})监听该巡航器移动事件that.infoWindow.open(that.map, that.navgtr.getPosition())- 在监听回调中打开信息窗体将巡航器坐标传给信息窗体就会产生信息窗体一直跟随巡航器的效果
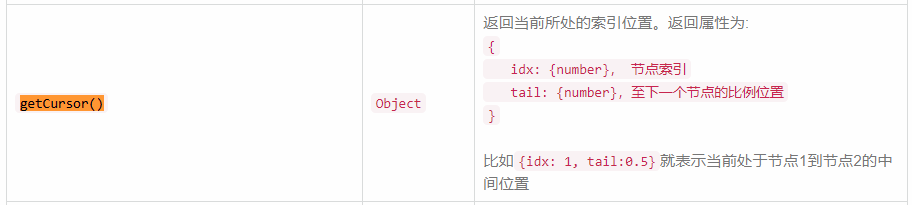
this.getCursor().idx返回当前所处的索引位置,即要实现每经过一个坐标点就展示该点的信息数据,有了这个方法就可以用它来充当dataList的下标来达到我们的需求
1 | drawNavgtrPath(dataList) { |
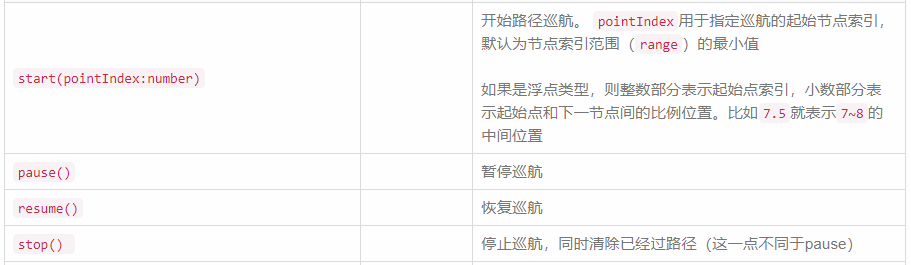
巡航器开始、暂停、继续功能
效果图:
要实现上图这种按钮效果我们只需要使用高德API提供的 getNaviStatus() 函数即可,在计算属性中添加 getNaviStatus() 函数,它会返回巡航器的 状态,之后将该计算属性绑定在按钮的 v-show 上
1 | computed: { |

使用如下方法控制巡航器 状态 并绑定在按钮上
1 | startNavgtr() { |
开始之前巡航器的状态为 stop(停止),这里还有个变量是 navgtrEnd 该变量的作用是巡航 一轮 结束后让按钮重新显示 开始巡航 按钮,因为巡航器巡航完一轮后的状态为 pause(暂停)状态。如果 getNaviStatus == 'stop' 或者 navgtrEnd==true 显示开始按钮,那么具体怎么判断巡航器走完一轮呢?
在上述 drawNavgtrPath() 函数的 move 监听中书写如下代码:
idx 是巡航器经过第几个点,从 0 开始,dataList 的 length 从 1 开始计算所以要 +1 ,如果 === dataList 的长度则表示本轮结束,设置 that.navgtrEnd = true,显示开始按钮。
1 | // 通过 监听判断巡航器是否走到最后一个点来确定本轮结束 |
1 | <el-button |
点击 开始按钮 后巡航器状态处于 moving 状态,则 DOM 上显示 暂停按钮
1 | <el-button |
点击 暂停按钮 后巡航器的状态是 pause(暂停)状态,则 DOM 上显示 继续按钮,因为巡航器走完一轮的状态是 pause(暂停)状态,为了防止走完显示的 继续巡航 按钮则需要附加 !navgtrEnd 条件,则 navgtrEnd==true 显示 开始按钮
1 | <el-button |
完整 demo
结语
世上所谓的“交友”是指彼此轻蔑又相互来往,并使双方越发无趣
本文采用 署名-非商业性使用-相同方式共享 4.0 国际 许可协议,转载请注明出处。


